Setting up equipment for a live performance
Risk assessments
Process/steps taken
Risk
|
Why
|
How
it can be minimalized/avoided.
|
Lids
from boxes
|
The
box lid is easy to trip over
|
To
minimalize this you could move the box to one side so then no-one is at risk
from being tripped over.
|
The
boxes moving
|
Encase
one of the boxes is too heavy and it is hard to move and pickup. Another risk
is that the box may not be locked when it is stood still
|
Making
sure that there is two people caring a heavy box. Make sure that you keep the
wheels on the box locked.
|
Tripping
over wires
|
Tripping
over wires can sometimes cause a serious injury. It also makes a mess for
everyone else with the equipment out because it may damage insides of wires
|
Making
sure that you are careful when walking around the equipment by watching your
step. Then it saves the wires being damaged. Tripping over wires can also be prevented by taping down any loose wires that can be a hazard
|
Unwanted/bad
noises
|
It
would ruin the recording from the unwanted noise and it would distract the
person that is recording.
|
Make
sure that you have gone step by step
|
Exposure
to live wire
|
It
can cause a electric shock on someone, which is not very safe for a recording
environment.
|
To
prevent a exposed wire that is live you put some tape over it. This would
prevent a electric shock to
|
Plug
sockets
|
Plug
sockets have a lot of voltage on them depending on the socket. In case
something which is a conductor of electricity goes into the socket it can
cause a serious accident.
|
To
prevent this you can check that plug socket is off and whenever you need to
use it you turn it back on
|
Water
near electric
|
Water
and electricity don’t go well. This can lead to electrocution. This also
damages the equipment if you use it which would make it either no-longer work
and it is unrepairable. Or you are able to get it to work and it no as
efficient
|
Make
sure whenever you want to take a drink of water you keep it away from any
electrical equipment.
|
Health
Risk
|
Make
sure that whenever you are lifting something or you are plugging something
you are safe making sure that there is no water or metal
|
Make
sure that you know what you are doing when you are plugin the required equipment
|
Noise
levels
|
For
the noise make sure that is it a respectable level so then it does hurt
anyone’s or making that it isn’t too quiet.
|
Make
sure that you have present the levels so then it is better to tell whether it
is loud or quiet
|
Feedback
|
Feedback
is not best and it is a horrible sound whenever it is loud. This can cause damage to speakers and ears.
|
Make
sure that the you keep the microphone away from the speakers or anything else
that can cause feedback.
|
-Take boxes apart
-Keep mixing desk on power supply and move desk to position
-lock wheels for safety
-Move base bins to position (left and right)
-Add pillars
-Set up main speakers on top, about same height
-Ensure everything is secure tight
-Connect speakon cables to power supply
-Make sure everything is taped and out of way
-Connect desk to the amps with jack leads (balanced)
-Plug to mains
-Flat line desk otherwise bad noises
-Add xlr cable for mic
-Turn on desk fire, check desk
-Turn on speakers
-Level testing
Using microphones and effects
Microphone Types
Microphones, how they work and different types
Different types of microphones include:
 - Condenser/ capacitor microphone- The unique thing about a condenser or a capacitor microphone is that it has two plates which have a voltage in-between them, one of the plates is a light material and it acts as the diaphragm. The diaphragm vibrates when sound waves hit it. Condenser microphones mainly picks up a voice, mainly something more lighter
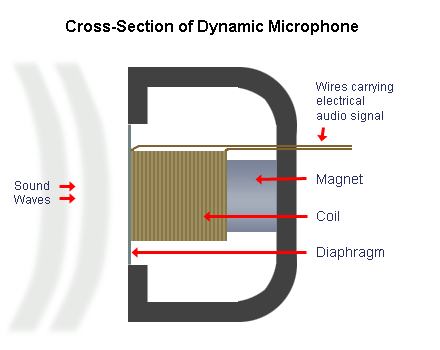 - Dynamic microphones- These types of microphones mainly pick up instruments, this microphone is mainly for more baser sounds because it this microphones are not as delicate. On this microphone the diaphragm vibrates in response to incoming sound waves. This microphone has a coil which creates current which channels along the microphone cables.
 Microphone Effects
- Compression- This reduces the loud noises which are inputed into the microphone. By using this you can speak quietly and it will output loud- Equalisation- This normally boosts or reduces the audio. This is good because it can make
- Re verb- Re-verb simulates types of rooms, re-verb can simulate a stage or a hall. This is useful because if you want to record someone speaking or a song you want like it is in a hall you can do this with re verb
- Noise gate-this cancels out any types of velocity when it is at the correct dbs, example: A loud noise is at 120dbs, you want to get rid of it. You would use a noise gate to get rid of the loud noise.
- Pitch Shift- This can higher the pitch of someone talking either making it a higher sounding noise or a lower sounding noise. This is good if you want to start off a music video in a lower sound to your noise.
Sets for setting up the recording studio
-Log onto the mac using login: teacher password: sicko
-Open cubase 7 not cubase 6
-Click cancel on any windows that pop up
-When loaded click file and new project
-Select 'empty' from the tab on the right (more);
-To check the desk is set up look up the folliwng:
Devices setup check the audio driver AISO is connect to the onyx fireware (desk)
Devices setup check the audio driver AISO is connect to the onyx fireware (desk)
Setting up equipment for live performance
-Take boxes apart
-Keep mixing desk on power supply and move desk to position
-lock wheels for safety
-Move base bins to position (left and right)
-Add pillars
-Set up main speakers on top, about same height
-Ensure everything is secure tight
-Connect speakon cables to power supply
-Make sure everything is taped and out of way
-Connect desk to the amps with jack leads (balanced)
-Plug to mains
-Flat line desk otherwise bad noises
-Add xlr cable for mic
-Turn on desk fire, check desk
-Turn on speakers
-Level testing
Equipment List
-Mixing desk Yamaha EMX 5016 CF
-Power Amp, ASX 18 dB Technology for mixing desk, the t,amp A1400 for main speak, the t.amp A2400 for the sub speakers
-Sub Speakers (dBs)
-Main Speakers (dBs)
-Support Pillars
-XLR cables
-Speakon cables
-Jack cables
-Masking Tapes
-Power leads
-Shure SM58 microphone
Video
https://www.youtube.com/watch?v=_Lx1o1AU8Nc&feature=youtu.be


